Get reconciling. In five steps.
Prepare your files, upload, map the columns, review discrepancies, export the fix list. That's the whole loop — usually under five minutes from browser tab to board-ready report.
Five steps, in detail.
Each step is reversible and reproducible. If something looks off, go back — nothing is persisted until you export.
Prepare your files
ReconcileIQ offers multiple ways to get your transaction data. Choose the method that works best for your setup.
Direct API integration (recommended)
Connect your accounting software directly:
- QuickBooks Online — real-time sync
- Xero — direct connection
- Sage — seamless integration
- Pandle — complete API
Benefit: one-click fix push back to your accounting software.
File-based processing
Export files manually:
- CSV / Excel exports from any system
- PDF converter for any bank
- Works with any bank or accounting software
Benefit: maximum compatibility and control.
Method 1: file export requirements
If using file-based processing, you'll need two separate files:
- Bank statement file: downloaded from your online banking portal (CSV, Excel, or PDF for supported banks).
- Accounting records file: exported from your bookkeeping system (e.g., Xero, QuickBooks, Sage).
Supported file formats:
- CSV / Excel:
CSV,XLSX, orXLSfrom any bank or accounting software. - PDF converter: PDF bank statements from any bank (Lloyds, HSBC, NatWest, Mettle, Monzo, etc.) — automatically converted to CSV.
File requirements checklist:
- Date range: both files should cover the exact same time period.
- Headers: the first row should contain clear column headers (e.g., "Date", "Amount", "Description").
- Essential columns: each file must contain columns for:
- Transaction date: when the transaction occurred (e.g.,
Date,Transaction Date,Posted). - Transaction amount: either a single column with positive/negative values or separate columns for money in/out (e.g.,
Amount,Credit/Debit,Money In/Money Out). - Transaction description: details about the transaction (e.g.,
Description,Narrative,Reference).
- Transaction date: when the transaction occurred (e.g.,
- Optional fee column: if your statement has a separate column for fees, ReconcileIQ handles it (e.g.,
Fee,Charges). Fees are treated as negative amounts (outflows).
Example accepted headers:
| Column type | Common header examples |
|---|---|
| Date | Date, Transaction Date, Posted, Value Date |
| Description | Description, Narrative, Details, Reference, Memo |
| Single amount | Amount, Value, Total, Gross |
| Money in (credits) | Credit, Credit Amount, Money In, Deposits |
| Money out (debits) | Debit, Debit Amount, Money Out, Withdrawals |
| Fee (optional) | Fee, Fees, Charges, Commission |
Upload files to ReconcileIQ
Go to the ReconcileIQ dashboard (bankreconciler.app/tool):
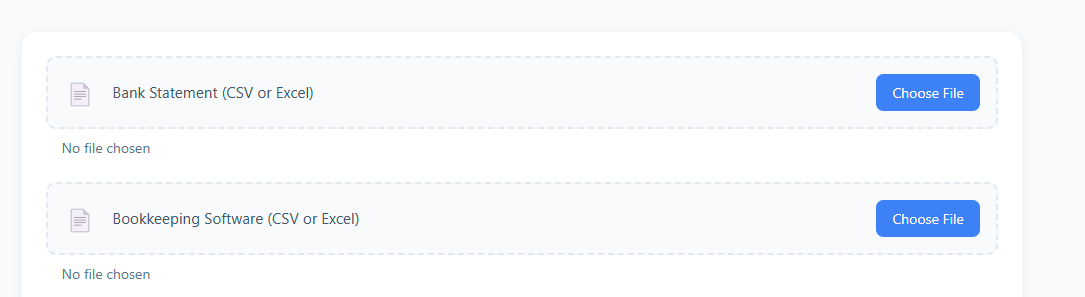
- Locate the "Bank Statement" upload area.
- Click "Choose File" or drag & drop your bank statement file (CSV, Excel, or PDF) onto the area.
- If uploading a PDF, ReconcileIQ converts it to CSV automatically — any bank, any country.
- Repeat for the "Bookkeeping Software" upload area using your accounting records file.
- Once both files are selected, click the "Reconcile Statements" button to proceed to mapping.
Map columns & set currency
This step tells ReconcileIQ where to find the necessary data in your files.
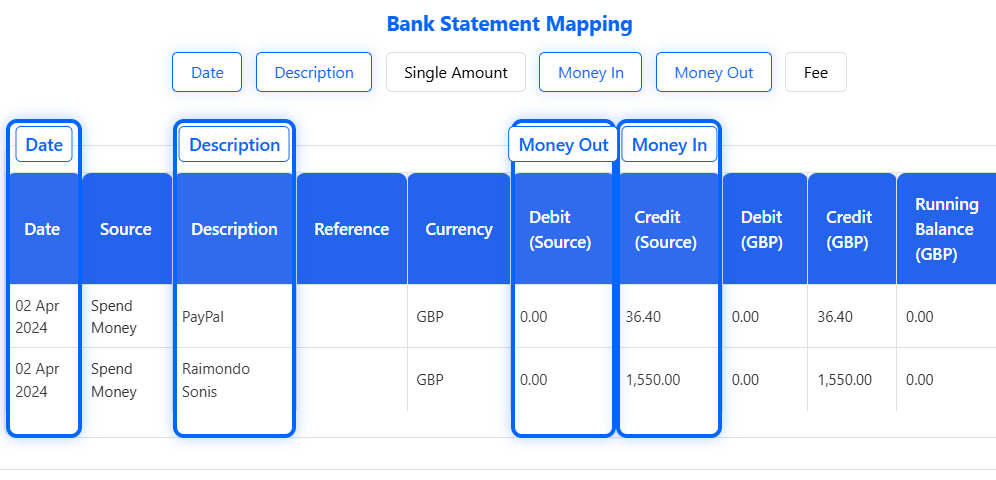
- Automatic detection: ReconcileIQ identifies Date, Amount (or Money In/Out pair), and Description columns based on common headers, and highlights its suggestions.
- Verify mapping: check that the highlighted columns (blue overlays) correctly correspond to Date, Amount/Pair, and Description in both files (Bank and Books). Review the sample rows shown.
- Adjust if needed: if the automatic mapping is wrong, click and drag the blue header labels (e.g., "Date") to the correct column header.
- If you use separate Debit / Credit columns, use the "Map Money In / Money Out" toggle and map both.
- Map optional fee: if you have a separate Fee column, click the "Map Fee" toggle and drag the "Fee" label to that column.
- Set currency: use the dropdown at the top to select the file currency (GBP, EUR, or USD). This ensures amounts are interpreted correctly.
- Confirm: when satisfied, click "These columns are correct".
Reconcile & review results
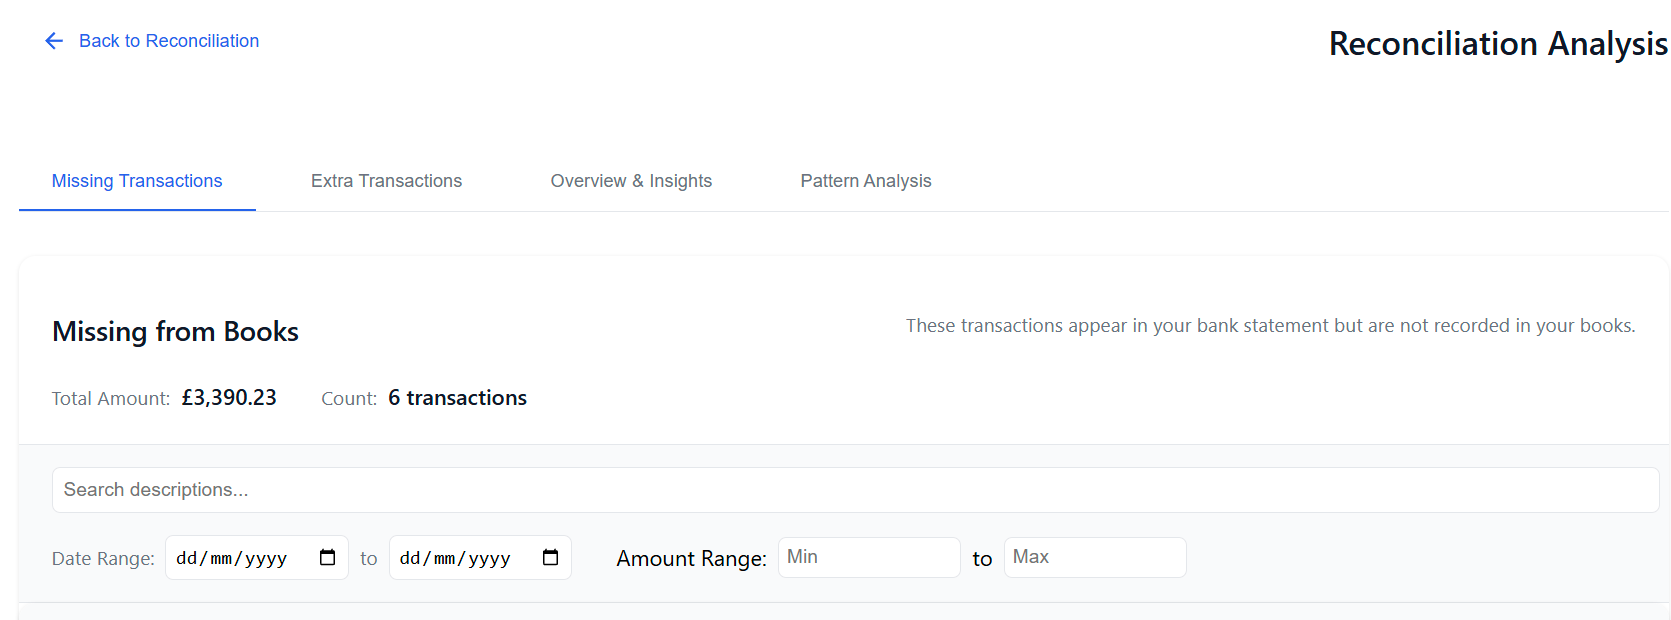
Once columns are confirmed, ReconcileIQ processes your files and displays results. Focus on the key discrepancy tabs:
-
Missing from BooksTransactions found in your bank statement but not matched in your accounting records. These typically need to be added to your books.
-
Extra in BooksTransactions in your accounting records but not in the bank statement. Investigate these — common causes are timing differences (e.g., cheques not cleared), duplicate entries, or errors.
-
Overview & insightsSummary, charts comparing totals, and insights or patterns observed (depending on plan).
Use the tabs at the top of the results page to switch between these views.
Export & take action
ReconcileIQ identifies discrepancies; the final step is acting on them.
- Export reports: at the bottom of the 'Missing' and 'Extra' tabs, use the "Export PDF" or "Export CSV" buttons.
- CSV is useful for importing missing transactions into accounting software.
- PDF provides a formatted report for records or sharing.
- Action missing items: use the exported 'Missing from Books' list to add these transactions accurately into your accounting system.
- Investigate extra items: review the 'Extra in Books' list.
- Timing differences? (e.g., cheque issued but not cashed) — usually no immediate action.
- Duplicates or errors? — correct or delete them in your accounting system.
- Verify (optional): after making corrections, export a fresh accounting file and re-run the reconciliation to confirm everything matches.
Code the statement. Post it back.
CodeIQ reads a client's own ledger history, codes every line of a bank statement against it, matches the outstanding invoices, spots the transfers and reviews the VAT. You check its work and it posts back reconciled. It runs on Pandle, QuickBooks, Xero and Sage, and natively inside IQ Books.
Six steps, from statement to ledger.
Nothing posts until you say so. Everything you correct on the way is remembered for the next time that client comes round.
Connect the platform
CodeIQ works on top of the ledger you already keep, or inside our own.
- Pandle, QuickBooks, Xero or Sage — connect once through the platform's own sign-in. We never see your password.
- IQ Books — no connection needed. Open Banking and click Bookkeep this organisation in CodeIQ. It opens over the top of your books and posts straight back into them.
Once connected, pick the client you want to work on.
Let it read the client
Before it codes anything, CodeIQ builds a picture of how this particular client is kept. It reads the general ledger history and reverse-engineers the patterns in it, then pulls the chart of accounts, VAT codes, customers, suppliers, tracking categories and every outstanding invoice.
This runs in the background and takes about a minute. You can have up to ten clients open at once, each in its own tab, all processing independently.
Drop in the statements
Give each bank account the statement that belongs to it. CSV, PDF, Excel, OFX and QBO are all read, and the columns are detected for you with a mapping screen to correct if a bank does something unusual.
Multiple accounts in one session is the normal case, not the exception. Transfers between them are found in step five rather than coded twice.
Add the paperwork
Drag in whatever else you were given for the period. Scanned, photographed and handwritten documents are all read into accounting data, not just filed.
- Bills, invoices and receipts — extracted, then matched against the invoices already outstanding on the client.
- Marketplace statements — eBay, Amazon and PayPal are parsed into sales, fees, postage and refund journals, with payouts left for the bank to clear. Other exports such as Stripe, Etsy and Square are mapped with RiQ's help.
Anything you add is synced back to the client's ledger when the session posts.
Write the context, then run it
A line or two on what the business actually does is the single highest-value thing you can give it. "Builders' merchant, trade counter and delivered sales, hires plant" changes how the whole statement is read.
Then process. Every line goes through an eight-phase pipeline: transfer detection, invoice matching, this client's own historical patterns, universal patterns learned across the network, card category matching, semantic analysis, your own prior corrections, and VAT classification.
Check it, correct it, post it
You get every line with its suggested account, VAT treatment, contact and confidence. Sort by confidence and the doubtful ones come to the top. Bulk-approve what is obviously right, and change what is not.
Your corrections are the point. Each one is learned against that client, so the second period is better than the first and the third is better again.
When you are happy, post. Journals, transfers and invoice payments go back to the platform, reconciled where the platform allows it.
Want the detail?
Pipeline phases, invoice OCR, multi-client sessions, the pattern database and the platform integrations.
The books themselves. Not a layer on top.
IQ Books is the accounting platform the rest of the suite was built around. Customers, suppliers, invoicing, bills, receipt capture, stock, projects, fixed assets, reporting, VAT and filing, with CodeIQ, LedgerIQ, PrepIQ and ReconcileIQ built in rather than bolted on.
From nothing to a working set of books.
If you would rather try before you commit anything real, start at step two. The demo company is a complete set of books you cannot break.
Create the organisation
Open IQ Books and the setup wizard asks for the things that actually change how the books behave: the entity type, the year end, whether you are VAT registered and on which scheme, and the currency you report in.
Answer those and you have a chart of accounts appropriate to the business, ready to adjust.
Or open the demo company first
The create-organisation screen offers a demo company, Ashgrove Supplies Ltd, a builders' merchant with a full year of trading behind it: customers, suppliers, stock, outstanding invoices and three bank accounts, one of them in dollars.
It comes with a download pack of a quarter's real-shaped paperwork, three bank statements and seven documents, so you can put a period through the whole loop yourself. Everything inside it is free, so run it as often as you like.
Opening balances, or a migration
A new business starts at zero and needs nothing here. An existing one has two routes in.
- Enter opening balances — the trial balance as at your start date, plus the invoices and bills still outstanding on each side.
- Migrate from Xero, QuickBooks or Sage — the migration pulls the trial balance, the customers and suppliers and the outstanding invoices, and lays down the opening balances for you. It brings the balances rather than every historical transaction, so the old ledger stays where it is as your record of the past.
Get the bank in
Add each bank, card and cash account, in whichever currency it is held. Then choose how the transactions arrive.
- Hand it to CodeIQ — the whole organisation at once, coded, matched and posted back reconciled. This is the fast route and the one most people should take.
- Import a CSV — lands as drafts you confirm line by line, with bank rules to categorise the ones that repeat.
- Enter it by hand — for the accounts that only move twice a year.
Run the business
Everything you would expect of a full ledger, in one place.
- Sales — quotes, invoices, credit notes, receipts, statements, reminders and recurring billing.
- Purchases — suppliers, bills, purchase orders, employee expenses, payment runs, and receipt capture that reads a photographed receipt into a bill.
- Ledger — journals, fixed assets and depreciation, prepayments and accruals, projects and time, multi-currency.
- Stock — products and perpetual inventory.
Close the period
Reports run off the ledger as it stands, with the audit trail behind every figure. From there the year closes out through the rest of the suite.
- VAT — returns prepared from the books and filed under Making Tax Digital.
- Analysis — send the ledger to LedgerIQ for the trend and ratio work, from inside Reports.
- Year end — Accounting, then Year-end close, where PrepIQ builds the working papers.
- Statutory accounts — prepared and filed from the same ledger.
Forty-three guides, inside the app
Every module has its own walk-through, from opening balances to CIS. They open in IQ Books itself, next to the screen they describe.
One ledger in. Forty-four modules out.
LedgerIQ takes the general ledger you already have and turns it into the analysis you would otherwise build by hand in a spreadsheet: statements, ratios, working capital, trends, forecasts, break-even, anomalies and a board pack at the end of it.
Five steps, from export to board pack.
The analysis runs in your browser. The ledger is the only thing it needs and it never has to leave the machine to be read.
Export the general ledger
From any platform, as CSV or Excel. What LedgerIQ needs is the transaction-level general ledger, every posting with its date, account, description and amount.
Working in IQ Books already? Reports, then Analysis, sends it across without an export at all.
Check how the accounts were read
Every chart of accounts is named differently, so the accounts are classified into their financial-statement categories on the way in, and RiQ gives a second opinion on the ones that are genuinely ambiguous.
You get to see and correct that mapping before anything is calculated. It is worth the thirty seconds: this is what decides whether an account lands in cost of sales or overheads, and every ratio downstream depends on it.
Work through the modules
Forty-four of them, grouped so you can go straight to what you need.
- Statements — profit and loss, balance sheet, cash flow, equity, trial balance, common-size.
- Ratios and working capital — liquidity, leverage, returns, the cash conversion cycle, receivables and payables, inventory.
- Profitability — margins, revenue deep dives, expense structure and correlation.
- Forward-looking — trends, seasonality, forecasting, break-even and what-if, DuPont, credit risk, tax efficiency, anomaly detection.
Put RiQ to work on it
RiQ sits on the loaded ledger, so it answers from the actual figures rather than in general terms. Ask why a margin moved, what is behind an expense line, or which months are carrying the year, and it can drive the dashboard to show you.
It also writes the narrative: a plain-English business report explaining what the numbers say, which is usually the part that takes longest by hand.
Take it to the meeting
Board packs and PDF reports with your own branding, Excel exports for the figures, and chart images for a deck. A forensic audit view is there for the times you need to show your working rather than the conclusion.
Want the detail?
Module by module, with what each one is for and how to read it.
Year-end working papers. On your own template.
Give PrepIQ the trial balance, the ledger and the supporting records, and it works through the year the way a senior would: the adjustments, the reconciliation sheets, the balances that have to agree, all laid out on your firm's own working-papers template for you to review and sign off.
Five steps, from trial balance to sign-off.
PrepIQ is on the practice plans, Practice Essential and above.
Add your firm's template
Upload the working-papers file your practice already uses. PrepIQ works within it, so what comes back is in your format, your schedule order and your house layout rather than something you have to transcribe.
If you would rather see it work before committing your own, there is a default template to run against.
Upload the trial balance and ledger
The trial balance and the general ledger for the year, exported from whichever platform the client is kept on. The ledger matters as much as the trial balance: it is what lets a figure be traced to the postings behind it rather than accepted as a total.
Add everything else you were sent
This is the step that decides how much comes back queried rather than resolved. Anything that answers a question a reviewer would otherwise raise is worth attaching.
- Stock count and valuation at the year end.
- Aged debtors and aged creditors.
- Bank certificates or closing statements for every account.
- VAT returns for the year and the control account.
- Payroll year end, P60s and the final submission.
- Invoices behind anything capitalised, hire agreements, insurance schedules, the engagement letter and fee.
- The client's own emails explaining the odd items. These are read as evidence like anything else.
Let it work the file
It goes through the year the way a senior accountant would: agreeing the balances that must agree, building the reconciliation sheets, putting through the adjustments the evidence supports, and writing up what it did and why on each schedule.
Where the evidence does not settle something, it raises it rather than guessing, and drafts the query email to the client for you.
Review, revise, sign off
Read the file the way you would read a junior's. Every adjustment carries its reasoning and the figures link back through the schedules, so checking it is checking the work rather than re-doing it.
Anything you want changed goes back through Ask RiQ in plain English. When the file is right, sign it off and download the papers, along with the client query email if you need it.
It stays your file and your sign-off. The papers are prepared for your review, not filed on your behalf.
Want the detail?
Templates, what to send, how the adjustments are evidenced, and how to revise a finished file.
Ready for more detail?
This guide covered the basics. Dive deeper into fuzzy matching, pattern analysis, LedgerIQ, and troubleshooting with the full user guides.